Blog article about this project
The previous instructions were written against Debian Buster and can be found at this commit. People were starting to find the instructions didn't line up with the latest version of Debian Bookworm. These new instructions are less battle-tested than the previous version so if you run into any problems please raise it as an issue.
These instructions will assume that running the Flight Tracker on your Raspberry Pi is the only thing you're going to be doing with the device. The other assumptions are going to be:
- You've got your Raspberry Pi set up with Raspbian based on Debian Bookworm
- The username of the device is
pi - If you're not using a screen/keyboard attached to the Pi then you've figured out how to remote edit over SSH
For future reference, in this installation process we're going to use the following locations:
| Location | Purpose |
|---|---|
/home/pi/rpi-rgb-led-matrix |
RGB Matrix Driver |
/home/pi/FlightTracker |
The Flight Tracking software (this repo) |
/home/pi/FlightTracker/env |
The virtual environment we'll install the necessary Python packages |
/home/pi/FlightTracker/config.py |
Config file for this flight tracking software |
Before installing anything let's ensure our system is up-to-date:
sudo apt-get update
sudo apt-get dist-upgrade
This will take a while on a fresh device as it picks up all its updates.
- Assemble the RGB matrix, Pi, and Bonnet as described in this Adafruit guide.
- It is recommended that the solder bridge is added to the HAT in order to use the Pi's soundcard to drive the device's PWM.
- Please read the official installation instructions for further details before proceeding but don't run any commands or install anything yet.
- Use the following commands to install the
rgb-matrixlibrary. Please note the paths used in these instructions are used later in this guide and must be adhered to for everything to make sense.
cd /home/pi
curl https://raw.githubusercontent.com/adafruit/Raspberry-Pi-Installer-Scripts/main/rgb-matrix.sh > /tmp/rgb-matrix.sh
sudo bash /tmp/rgb-matrix.sh
- If the installation has worked successfully then there should be some demo applications available to run:
cd /home/pi/rpi-rgb-led-matrix/examples-api-use
sudo ./demo --led-rows=32 --led-cols=64 -D0
- Clone this repository:
cd /home/pi/
git clone https://github.com/ColinWaddell/FlightTracker
- Head into this repository and create a virtual environment, activate it and install all the dependencies
cd /home/pi/FlightTracker
python3 -m venv env
source env/bin/activate
pip install -r requirements.txt
- Head into the rgb-matrix library and install the Python library into our virtual environment. These commands assume you are still using the same environment that we activated in the above steps. If not, rerun the
sourcecommand in theFlightTrackerdirectory.
cd /home/pi/rpi-rgb-led-matrix/bindings/python
pip install .
These instructions will show you how to create a config file from the command line with nano but in reality you can do this however you want.
cd /home/pi/FlightTracker
nano config.py
Here is an example config you can copy into that file:
ZONE_HOME = {
"tl_y": 56.06403, # Top-Left Latitude (deg)
"tl_x": -4.51589, # Top-Left Longitude (deg)
"br_y": 55.89088, # Bottom-Right Latitude (deg)
"br_x": -4.19694 # Bottom-Right Longitude (deg)
}
LOCATION_HOME = [
55.9074356, # Latitude (deg)
-4.3331678, # Longitude (deg)
0.01781 # Altitude (km)
]
WEATHER_LOCATION = "Glasgow"
OPENWEATHER_API_KEY = "" # Get an API key from https://openweathermap.org/price
TEMPERATURE_UNITS = "metric"
MIN_ALTITUDE = 100
BRIGHTNESS = 50
GPIO_SLOWDOWN = 2
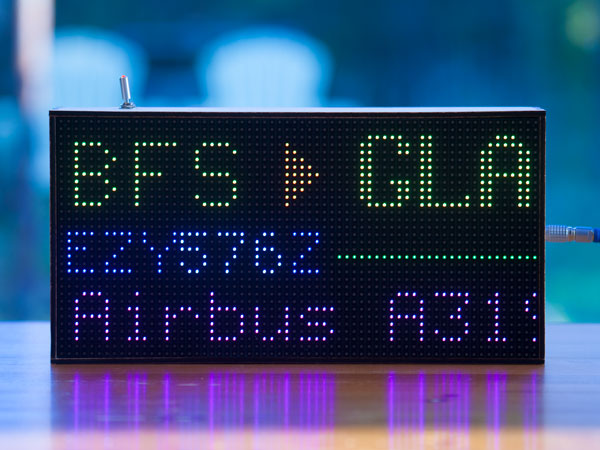
JOURNEY_CODE_SELECTED = "GLA"
JOURNEY_BLANK_FILLER = " ? "
HAT_PWM_ENABLED = True
To save and exit nano hit Ctrl-X followed by Y.
In reality you'll want to customise config.py for your own purposes.
| Variable | Description |
|---|---|
ZONE_HOME |
Defines the area within which flights should be tracked. |
LOCATION_HOME |
Latitude/longitude of your home. |
WEATHER_LOCATION |
City used to display the temperature. Format: "City" or "City,Province/State,Country" (e.g., "Paris" or "Paris,Ile-de-France,FR"). |
OPENWEATHER_API_KEY |
If provided, enables OpenWeather API. Get a free key here. (Optional) |
TEMPERATURE_UNITS |
One of "metric" or "imperial". Defaults to "metric". |
MIN_ALTITUDE |
Removes planes below this altitude (in feet). Useful for filtering out planes on the tarmac. |
BRIGHTNESS |
Range 0–100. Adjusts brightness of the display. |
GPIO_SLOWDOWN |
Range 0–4. Higher values help reduce flickering on faster hardware (e.g., 2 for Pi Zero 2 W). |
JOURNEY_CODE_SELECTED |
Three-letter airport code of a local airport to display in bold. (Optional) |
JOURNEY_BLANK_FILLER |
Three-letter text used in place of an unknown airport. Defaults to " ? ". |
HAT_PWM_ENABLED |
Enables PWM via Pi’s soundcard. Requires solder bridge modification. Defaults to True. |
Previous versions of the instructions always pointed out to run everything as root for performance reasons but for security I think this is best avoided. Plus the latest version of the GPIO driver and rgb-matrix have strong opinions about who is in charge when running as root.
To avoid running as root and to grant Python permission to set real-time scheduling priorities, run the command:
sudo setcap 'cap_sys_nice=eip' /usr/bin/python3.11
The software can now be tested by running it from the command line
cd /home/pi/FlightTracker
env/bin/python3 flight-tracker.py
To quit tap Ctrl-C.
This repo contains an example .service file to allow this software to be easily run on boot. Provided that the same paths have been used in your own installation as these instructions then you shouldn't need to edit this file.
sudo cp /home/pi/FlightTracker/assets/FlightTracker.service /etc/systemd/system/FlightTracker.service
sudo systemctl daemon-reexec
sudo systemctl daemon-reload
sudo systemctl enable FlightTracker.service
sudo systemctl start FlightTracker.service
Any problems, check the status and logs:
sudo systemctl status FlightTracker.service
journalctl -u FlightTracker.service -f
An LED can be wired to a GPIO on the Raspberry Pi which can then blink when data is being loaded.
To enable this add the following to your config.py. Adjust LOADING_LED_GPIO_PIN to suit your setup.
LOADING_LED_ENABLED = True
LOADING_LED_GPIO_PIN = 25
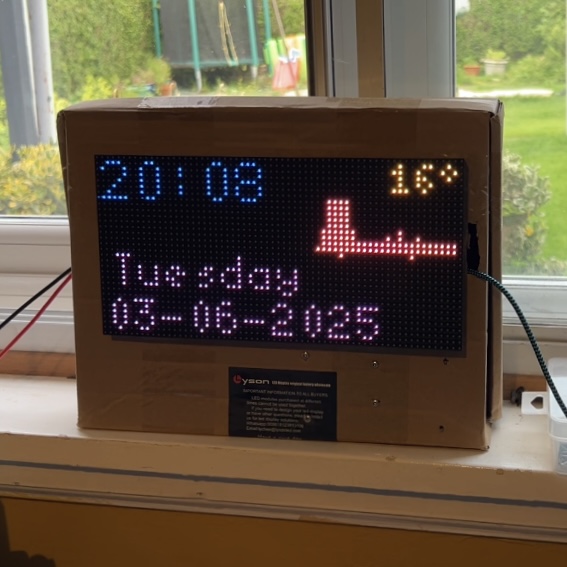
If weather data is being pulled from my server (as opposed to using OPENWEATHER_API_KEY) then you can
display a chart of rainfall by adding the following to your config.py:
RAINFALL_ENABLED = True
As of April 2025, Flight Tracker is released under the GNU General Public License v3.0
You’re welcome to use, modify, and share the code—just keep it under the same license and include proper attribution (retain my copyright and license notice). See LICENSE for details.
I had to add this license as folks have started selling these online as their own with zero attribution. Open-source projects like this are our CVs: they show peers and potential employers what we can do. Passing off someone else’s work as your own robs us of our chance to promote ourselves.